December 31, 2010

Corn Bread Muffins to Knock You Out, Literally

So my office decided to have a potluck Thanksgiving brunch/lunch/snackfest and everyone was supposed to join in. We had just successfully had some kind of football tailgating one a few months prior and everyone was game. No pun intended.

Since it was Thanksgiving, I immediately searched one of my many recipe hoarding places. Yes, I have many. I think I have a problem as you can tell I do not attempt to actually cook that often. Maybe in the new year? As my husband would say, "promises, promises." Actually he would say "HAHAHAHAHAHHA", but that's a different story.

So I found this recipe for cornbread muffins from melskitchencafe.com (formerly Mel's Kitchen when I found the recipe) and decided to give it a try.

The ingredients I used:


In case you don't have your magnifying glass with you, that would be 2 cups of flour (all purpose), 1 cup yellow cornmeal (I bought the Kroger brand), 1 1/2 teaspoons baking powder, 1 teaspoon baking soda, 1/2 teaspoon salt, 2 large eggs, 3/4 cup sugar, 8 tablespoons butter, melted and cooled (I believe this was one whole stick), 1/2 cup of milk.

What I did not use: 3/4 cup sour cream. This will be important later.  I am also not sure I put in enough sugar because the original recipe only said "3/4" and I am not sure if I did cup or spoon. That will also be important later.

First, you whisk the flour, cornmeal, baking soda, baking powder and salt in a medium bowl (in the back in the picture). Actually, first you have to find a whisk. I searched high and low. Later I had to explain to my husband what a whisk was. Then he showed it to me in my bucket of gadgets. Nice.

Next, whisk eggs in second bowl until combined.  Add sugar and whisk vigorously until thick and homogeneous, which I think means thick and one? I need a chef.

Add the melted butter in 3 additions, whisking every time.  Add half the milk (and half the sour cream if you are following directions unlike me) and whisk to combine, then repeat.


Next, add the wet ingredients to the dry ingredients and gently combine with a rubber spatula - that I had and knew where it was. Yay me!

Here is where it gets tricky - you are not supposed to overmix, just get everything wet which is probably why some of the muffin batter still looked like flour. Or maybe it was the missing sour cream.


Put them in the muffin pan like so, but preferably less messy. Then put the pan (or pans in my case) into your preheated 400 degree oven and bake for 15-18 minutes until golden brown and a skewer in the middle comes out clean. It is also recommended that you move the pan(s) from the front to the back midway through baking.


As I am sure you can guess, these did not turn out well. I take full blame as I am sure Mel's recipe is good.  From what I can tell from the comments, the sour cream makes all of the difference. Figures, since I didn't use it.

Thankfully, I had a box of this in my cupboard:


I also made some chocolate chocolate chip muffins from a box that turned out to be a hit. That is not even Thanksgiving food people!

Verdict:

Too dry and hard as a rock. I assume too dry due to the lack of sour cream and overbaking. Hard as a rock definitely from overbaking. If I would bake more, I would remember that my oven is supercharged and I need to always take things out on the low end.  My only other complaint is that they were not sweet enough. That might have to do with the sugar problem too.

What I learned:

  1. Do not omit ingredients. I am not nearly a good enough cook to know when something is important or not.
  2. Remember how your oven cooks. 15 minutes was plenty. 18 minutes turned these to golf balls.
  3. Use your Kitchen Aid mixer more.  Luckily my husband now proudly displays it on our counter.
  4. Do not attempt to make a brand new, never cooked recipe before a big party. Didn't I learn that last year?
  5. Birds will eat anything
Any thoughts on this recipe, folks?  

September 6, 2010

Salsa Crockpot Chicken - Not Exactly Making Me Want to Dance Just Yet

It's about time I updated this blog. According to my stats, I have only cooked nine times since January 1st. That seems about right. That also seems quite sad.  Also? I haven't cooked anything since April, almost five months ago.  My husband thinks that is quite sad.

So thank you Julie & Julia. I watched you the other day and was inspired. Mostly to eat lots of gourmet food, but also to cook a meal and blog it.  Unfortunately, I was only a little bit inspired so you get a slow cooker meal.  Even sadder? I kind of phoned it in and even apologized to my husband.  Good news though - I have figured out ways to make this better the second time around.  

It's a start.

First, this recipe came from SparkPeople.com so it is supposed to be healthier.  At least if you follow the instructions. I did not.  We got the full fat salty mostly unhealthy version and it still didn't taste as good as it could have.  Sigh.

The ingredients I used:


That would be two chicken breasts, 1 cup mild salsa, half of a package of taco seasoning, one can of healthier cream of mushroom soup, and a splatter of dried onion flakes.

What I was SUPPOSED to use was low sodium taco seasoning and low sodium cream of mushroom soup.  It would have helped as this was quite salty.

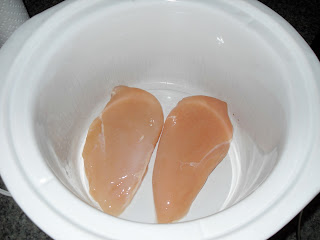
First, put the chicken breasts in the crockpot:


Then sprinkle them with taco seasoning (although not as much as I did or it will have a REAL taco taste):


Then cover those breasts with the salsa:


Then the cream of mushroom soup:


And then the onion flakes which I added because I wanted it to have a kick, but you could leave out because it didn't seem to do a damn thing:


I didn't take a picture of the finished product because it just looked like shredded chicken. Also I forgot.

Verdict:

Too salty and too taco tasty.  As I told B, I just phone this one in.

What I Learned:

  1. There is a reason a recipe says no sodium - listen to it!
  2. This needs more of a spicier salsa to get rid of the taco flavor.
  3. Bell peppers would have been a nice addition
  4. The sour cream the recipe calls for and I left out might have neutralized the salty taste.
  5. When making mexican dishes, it is best to have lettuce or some mexican cheese, not just shredded mozarella on hand. 
  6. You really should have rice or beans or something on hand when making burrito type meals.


This one will be revisited, folks.


April 5, 2010

Veggie Pizza Pie - My Oh My

Recently I had a party at my house. You know, one of those come over to my house and buy things from my hostess and this catalog type parties. Unlike candles and jewelry, though, mine was focused on food things - cooking utensils, cookware, spices, etc. That meant that my guests (all 3 of them) got to feast on a meal basically prepared at my dining room table by the hostess using all of the things found in the catalog and which, of course, you could buy.

I am a sucker. I want to buy everything.

Anyway, the meal was a vegetable pizza that was so yummy, so light and so incredibly easy to make, that I thought I would share it with you.

Sadly there are no pictures.

For ingredients you will need:

1 tablespoon vegetable oil
1 package refrigerated pizza crust
2 garlic cloves*
1 cup shredded cheddar cheese
1 cup shredded mozzarella cheese
1/4 cup grated fresh Parmesan cheese
1 teaspoon Italian seasoning
1 small onion
1 medium zucchini**
2 plum tomatoes***
1 cup fresh mushrooms

You also need an oven preheated to 400 degrees.

Start by putting the crust on your choice of pan. Of course, since this was a demonstration, we used the special pizza stone or whatever. Thus, we didn't need to spray or oil it. If you don't have one, and need to oil your pan, use 1 teaspoon of vegetable oil.

Spread the pizza crust on the pan. Spread the tablespoon of vegetable oil over the crust. Press two garlic cloves and spread that over the crust.

Combine the 1 cup shredded cheddar cheese, 1 cup shredded mozzarella cheese, and 1/4 cup grated fresh Parmesan cheese into a bowl. Spread half of the cheese mixture on to the crust, over the garlic. Pop the pizza in the oven for about 6 minutes.

Six minutes later, put the onion, zucchini, tomatoes and mushrooms on the top of the pizza. Sprinkle with the remainder of cheese mixture.

Now go back to the refrigerator and get more cheese. More cheese will be needed. More cheese makes everything okay.

Bake for another 12 minutes or until the crust is golden brown.

Devour.

And if you are like my husband, yes you can remove all of the vegetables and just eat pizza crust with garlic and cheese on it.

Actually, I imagine you could substitute various different vegetables on here. I might have to try that some day.

Now go have a relatively healthy pizza party!

You deserve it.


*No, I did not know that there were more than one clove in a bulb of garlic. Yes, I bought two bulbs of garlic. That is a LOT of garlic.

**No, I never purchased a zucchini before. Yes, I thought it looked like a cucumber. Of course there was a mini argument between me and my husband during the party as to whether he needed to go "RIGHT NOW to get a REAL zucchini." Luckily, mine was good enough.

***No, I don't know what plum tomatoes are. Yes, I deduced they need to be kind of longer so they could be cut in perfect little circles and not big quarter pieces like I normally do with my tomatoes. Also, I usually don't spell that with an "e".

February 23, 2010

Chicken Parmesan in a Crockpot

The minute I saw this recipe, I was intrigued. It also helped that one of B's favorite dishes is Chicken Parmesan. Make your husband's favorite dish in a crockpot with minimal effort? Score!

To make this dish, you need the following ingredients:


First mix together the spices and dry ingredients including 1/2 cup breadcrumbs, 1/4 cup shredded Parmesan cheese, 1/2 teaspoon Italian seasoning, 1/4 teaspoon black pepper, and 1/4 teaspoon kosher salt (I just had plain white salt - so common), like so:


Then take 1 tablespoon olive oil and spread it at the bottom of the stoneware of your crockpot. Or, if you are me, create an eclipse like effect as so:


Meanwhile, in another bowl beat one egg with a fork. Note that you will use this bowl and the dry ingredients bowl to dip the chicken into so make sure you have room:


Dip each chicken breast in the egg bowl and then the dry bowl until completely covered and then place in the bottom of your crockpot:


Then cover the chicken with slices of mozzarella. I may have gone a bit overboard with the cheese:


Finally, add one jar of your favorite sauce:


Then cook on low for 7 hours and serve over your favorite pasta. I chose plain ol' spaghetti although, secretly, I am a mostaccoli girl. How do you even spell mostaccoli? My husband likes spaghetti so I went that route.

Verdict:

B didn't like it because the breading wasn't crunchy and the cheese was all "goopy." I didnt mind the cheese or lack of breading, however, the overall taste was lacking.

Things I learned:
  • I still really don't like salt and I keep tasting it in everything. I am going to stop adding it.
  • I like my sauce a bit sweeter (thanks Mom!) so when I make another dish with sauce, I will add some molasses (double thanks Mom!)
  • Cheese will melt and just blend in with the sauce if you cook it for 7 hours
  • I like cheese a lot!
  • Some things are better done the old-fashioned way rather than in a crockpot

Tell me:

Do you have a good Chicken Parmesan recipe?


February 14, 2010

It's a Hit! Asian Shredded Beef in the Crockpot a/k/a I Will Eat Anything with Chow Mein Noodles

Since today was Valentine's Day and I *love* my husband, I decided it was guinea pig day and that we needed to try a new dish in our crockpot rotation. Isn't that what love is all about, experimentation?

Not so much in this house, but I crossed my fingers and hoped for the best. And it was good. Very, very good.

Taken from my favorite food blogger, The Crockpot Lady, I went with:


These are the ingredients you need. I used an almost 4 lb roast. We have plenty left over.


First you need to plop your roast in the pot like so:


Then add 2 teaspoons of garlic powder and 2 teaspoons of Chinese 5-spice. Add to that 6 tablespoons of ketchup and 6 tablespoons of honey. Then on top of that add 1/2 cup soy sauce and a 1/2 cup of hoisin sauce so it looks messy like this:


Set the crockpot to low for 8 hours. After 8 hours, cut up the roast in big chunks and turn to high for another hour. Then the roast will shred so simply with a fork like so:


Okay, maybe not the most attractive picture, but you have to trust. I served it with white rice and chow mein noodles. So beautiful:


Verdict:

B said this was really good. I liked it, but felt it was a bit salty and needed a bit more flavor.

Things I learned:

  • I really don't like salt so I may either get a half sodium soy sauce next time or cut the amount in half
  • I like things with a bit of kick so I am looking for an ingredient to slightly spice this up
  • I may either add more honey or some brown sugar next time for a bit of a sweeter taste
  • Chow mein noodles rock (but I already knew that)
  • Shredded beef is more than just for sandwiches
  • Tell me:

    Any thoughts on what I could use to sweeten and/or spice this dish up?